
Manchester Guitar Tech
More on preparation – sanding sealer and using an index coat
I’m building myself a “La Cabronita” style guitar in black, with a very nice one-piece alder body from Phil at GuitarBuild.co.uk.
I can’t stress enough the need for thorough preparation for a guitar finish to turn out well. Black lacquer is very reflective and shows every defect, so it is especially important here.
Sanding sealer
 The first step is to sand the body well with fine sandpaper to remove any fuzzy edges from the machining process, then to apply plenty of sanding sealer.
Alder is a very absorbent wood and you’ll see it soaking into the wood, especially on the end grain.
I sprayed several heavy-ish coats until the end grain remained wet-looking, indicating that the wood had stopped soaking up the sealer.
Once I thought that I had plenty of sealer on, I let it dry overnight before block sanding.
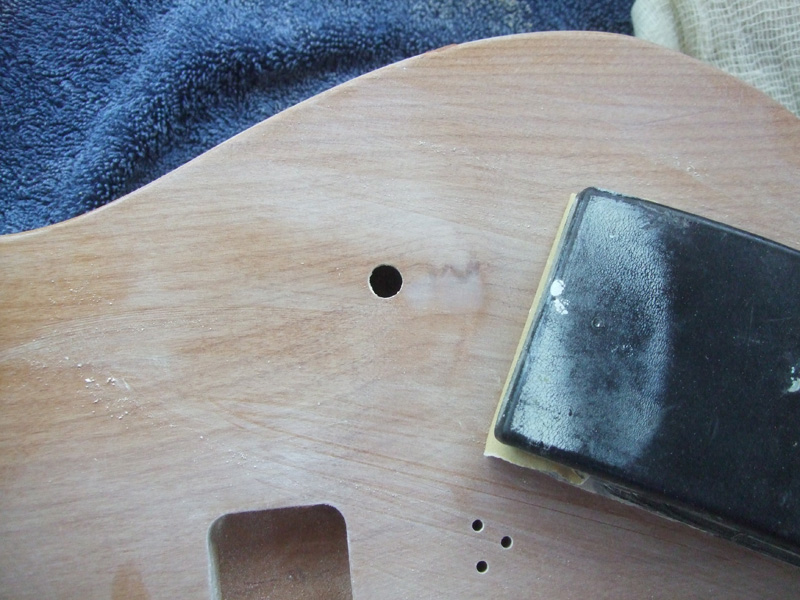
Sanding showed up a few low spots and defects in the wood which I needed to treat.
The worst of them were a small knot between the control holes which could be seen as the sanding dust collected in it

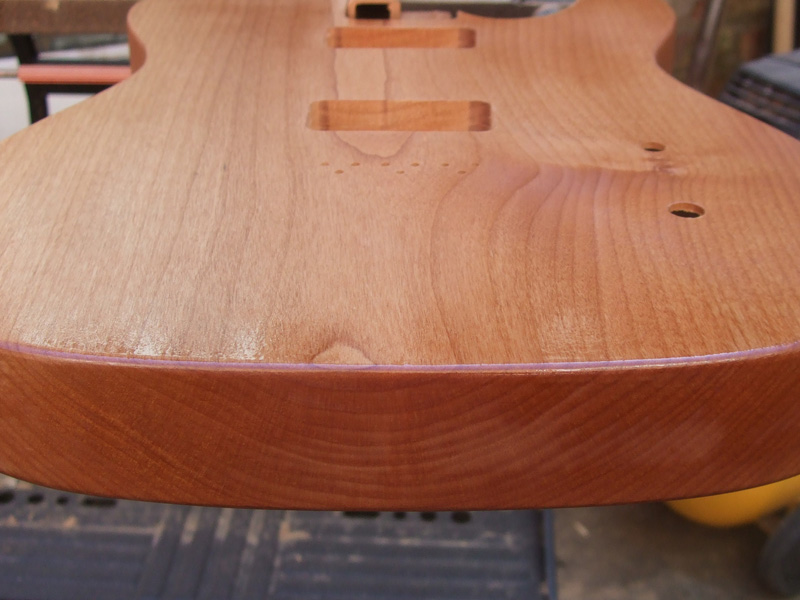
and a depression in the edge of the body which remained shiny and unsanded.

Depression in edge of body
I filled each of these with Ronseal 2-pack brown wood filler

Knot filled with 2-pack filler

Depression in edge of body filled
and sanded smooth.

Knot fill sanded smooth

Edge repair sanded smooth
Afterwards, the whole body was given another coat of sanding sealer and allowed to harden overnight.
Index coat
I wanted to be sure that I had sanded out and/or filled every imperfection, so decided to use a technique I learned from my car-spraying days called an index coat.
An index coat is a very fine mist coat of black (or another colour) lacquer which is typically sprayed over a primed surface.

Index coat sprayed
You can even use this on transparent finishes because you sand it off again.
The index coat highlights imperfections because as you block-sand your guitar body, it remains in any low areas such as the very slight depression around our knot

Index coat reveals unevenness
and a few tiny dings which would have gone unnoticed.

Index coat reveals small dings
I continued sanding until no black lacquer remained so I was sure that the faces of the guitar were perfectly flat and free of the tiniest of defects.
I sprayed another coat of sanding sealer and sanded to 320 grit, ready for the colour coat.
Hi Steve, hope your well.
I’m re-finishing my Mex Fender Player’s Strat. It was tough removing the finish even with a heatgun and had to do a bit of filling here and there. The swamp ash was very light when all the finish was off and removed a clear acrylic type coating. I was aiming to get more tone and was going the route of using sanding sealer and gloss black with a final coat of varnish. Would the black I’m about to order from you be gloss and do you do a final coat varnish spray ? As far as I remember you used to do gloss black and a semi matt one also ? Anyway, look forward to hearing from you.
Kind regards
Steve Payne
Hi Steve,
You’ll probably need to grain-fill the ash too if you’ve stripped it to bare wood.
The black is gloss but you’ll get a deeper shine if you use a top coat of clear gloss lacquer.
Cheers,
Steve
Hi Steve,
Thank you for all your advice, I still have some sanding sealer I got from you and will order Black Nitro and a clear top coat. I have a grain filler also and will order when I get paid. I’m really excited about this project and your excellent products. I’ll aim to send a picture of end result.
Kind regards
Steve Payne
A picture would be great thanks
Hi Steve,
I’m preparing to refinish my Gibson Les Paul. I have a flamed maple top that I want to ‘ pop’. I’m aiming for a tobacco sunburst ( or bourbon burst, if you have any tips on that I love to hear them). Is it wise to use sanding sealer in this case? Wouldn’t that interfere with the natural grain of the maple and the absorption of the dye that creates that flame?
I’d just use lacquer on the maple top as the grain is so tight. You’d need to stain before applying any lacquer or sealer of course.
You mention putting on plenty of sanding sealer. How do you know when is enough? I’ve put 4 coats on my stained maple top. While it looks coated, the grain is showing through. Should I keep adding coats over a few days? The maple was sanded to 320, grain raised, 400, stained, then sealer applied. 4xcoats of 2 passes.
You need to sand the sealer back to make it smooth. Be careful not to go through though as you don’t want to damage your stain.
Cheers, thanks for the quick reply. Very pleased with the cans I’ve bought from you so far.
Hi Steve, how much time do you leave in between coats?
Of sanding sealer? You need to let it dry hard, 24 hours or more, before flatting and re-applying if necessary.
Of course a coat is made up of several passes and my advice, as above, would be to get quite a lot on.
I want to paint/finish an alder guitar body and still confused whether sanding sealer is required or not before applying the primer (I want an opaque look hence the primer). In an older post here:
https://manchesterguitartech.co.uk/2011/09/01/finishing-an-alder-telecaster-body-in-metallic-lacquer/
you mentioned this:
You don’t really need primer but I think it helps give a good result. Alternatively, you could use primer instead of sanding sealer as it will do a similar job but it can be a bit soft if sprayed too thickly.
So what is it then? Sanding sealer or not before primer for opaque looks?
Thanks for your time. Have a nice weekend!
Best regards,
George
You can use either or both. I prefer sanding sealer for levelling for the reason stated.
I always use white primer under a Fender finish but never for a Gibson.
Thanks Steve. Not a Gibson or a Fender as such, but a (super) strat (Fender like) 3-piece alder body from (surprise! suprise! :p) guitarbuild.co.uk
Best regards,
George
By the way, I forgot to ask. For tiny cracks (eg, like around knots), is it better to use a wood filler (like you explained in this blog post) or some epoxy resin that hardens rock solid? I happen to have a generic multipurpose filler (Polyfillia Quick Drying from B&Q) from a previous wood project. Would that work?
Best regards,
George
I’ve never used epoxy resin to fill cracks but it should work.
Would your aerosol sanding sealer be suitable for use on an alder body that will be stained and oiled rather than paint and other types of top coat?
No, use either oil or lacquer. Whichever you decide, if you want to use a stain you must do this on the bare wood.
Thanks Steve. Very useful information.
Steve
2 Questions:
1. Would you use primer for your Daphne Blue? – I am refinishing a Strat body so it is sealed though 1 ding might need filling.
2. Would you recommend a clear coat i.e not the light tint which has quite an effect on the colour?
Regards
Martin
Thanks Steve that’s just what I needed to know.
Hi Steve,
I’m planning to spray a swamp ash body, black top and natural sides and back. Am I right in thinking that after grainfiller has been sanded back with 320 grit, I then proceed with two or 3 coats of sealer, sand back with 320 grit and then prime? Obviously the sides and back won’t be primed as they’re going to be natural, am I okay to mask ( for the colour coats on the top) then apply lacquer straight on the sealer for that? Also do you sand back the primer for the top or just move straight on to colour coats?
Thanks
Matt
I wouln’t use primer under the black at all, just the sanding sealer. My demo shows you how to get a smooth sanding sealer coat. You can spray lacquer straight onto sanding sealer.
Okay, thanks Steve, appreciate that!
Hi have been given a part project, Korg ‘p’ bass. The body have been beautifully french polished, but needs a polyurethane sealer coat. What would you recommend? I have heard that water-based sealers would raise the grain and of course I can’t rub down between coats.
In addition, I am converting the fretboard to fretless. I will use maple infill markers on the rosewood board. Could you recommend a sealer for the neck/fretboard.
Sorry but I have very little experience of using polyurethane varnish or french polish. The last time I French polished anything was woodwork class at school around 1971.
HI Steve
just about to start a project with my son and we are aiming for a white burst effect… the body is really pale wood and we want to try to go from white at the edge with a gentle burst to the natural wood colour in the centre .
Should we be using sanding sealer ? will it affect the natural colour of the wood.
We are about to order the lacquers etc from you so any advice would be great.
ps total novices at this!
Yes you should use sanding sealer as the base coat. It is to all intents and purposes clear and will not affect the colour of the wood apart from a slight darkening which all lacquers will do as it fills the air pockets in the grain. To get an idea of what this looks like you can wet the wood – that is the colour it will be under the lacquer/sealer.
GREAT FEATURE, ADDRESSES ISSUES I NEED RESOLVED, BEFORE DOING IT! THANKS! ROB.
How would I know what type of wood my body is? It’s quite dark in appearance and seems quite a tight grain? Trying to establish if grain fill is required?
Thank you
Alan
You could try http://www.wood-database.com/
It’s called a guide coat and the reason why we call it that is because it guide’s your sanding and yes it will show every little imperfections and that is why we use it, although you used black I would use the exact color that’s to be used on the guitar I do this because in the event I don’t remove every last little bit thats alright I’m not going to see what was left because it’s the exact same color, this helps me because in the sanding process we stay off all edges and corners these are the first places that if your not paying attention to what your doing get all the sanding sealer sanded off.
Will any sanding sealer be ok to put a uv polyester topcoat on to it ?
I don’t know, I have never used UV cured polyester.
I’m planning to do a pretty heavy relic on an alder strat body.
Will the sanding sealer have the correct look when I do all the destressed /worn thru spots?
Thank you for sharing your techniques.
Joe NYC USA.
Yes, it will have the correct look. Fender used a sealer coat called Fullerplast (see http://www.caraguitars.com/fullerplast.htm) since the 60s.
When sanding the sanding sealer how far ‘back’ should one go? I’ve given the body 5 good coats. Thanks.
It needs to be as thin as possible whilst still covering all over and providing a flat surface. If you use an index coat as in the post above, you’ll see when it’s flat.
Steve, great info as usual.
Quick question – does it has to be nitro paint for a index coat or any dark spray paint will do? I have a dark brown spray can from B&Q i used to spray a speaker baffle for my amp. Works?
It should be okay as you sand it all off of course. Also as the index coat is sprayed very light (almost dry) then issues of compatibility are minimised.
Yes Steve got to agree with the other comments ,just to add I’ve sprayed 2 guitars before only as a hobby ,but without sanding sealer ,but what a difference sanding sealer makes ,on the other 2 I just put more primer on until it was flat, but sanding sealer (a) seals the guitar and (b) gets a really nice surface to add primer,colour, and clear to ,anyone thinking of cutting corners like I done in the past I recommend not to ,this paint is very good and flows nice and level to,thanks once again Steve for your great tutorials
These are some pretty valuable tips! I just found your blog, as I am refinishing some guitars and basses for a hobby. Will read it quite often from now on. Thanks for your tips, Steve!
Fantastic advice thanks again Steve! Once I put the sanding sealer coat on my Jaguar body I started noticing a lot of dings and scratched that I just couldn’t see when it was bare wood, this approach sounds like it will do just the trick. I tried to solve it by sanding and just laying on more sanding sealer to no avail, so I hope my sealer coat doesn’t end up too thick, might sand it back a bit. Wish me luck!
Hi Mike, yes, don’t be afraid to sand it back so that it just fills the dips and is nice and thin everywhere else. If you sand through, just spray another coat.